
Hello friends, I want to share with you a tag that was inspired by Tim Holtz, my favorite crafter and creator of some of my most favorite products!!!

On Tim's blog he is featuring his annual 12 days of Christmas tags! Every day for 12 days he has been sharing tutorials on how to make gorgeous tags and great tips on using his products! I hope you visit his blog and take a look at his beautiful and inspiring tags!

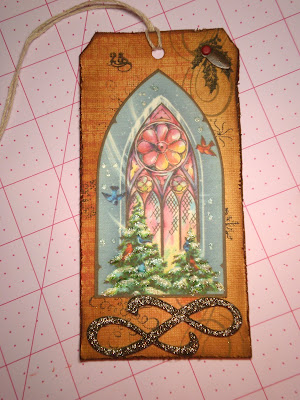
Now this is the tag I will be sharing with you today!
Start by printing this vintage card and cutting out the window.

Cut a sheet of white cardstock 3 x 6 inches. You can get 8 tags out of a 12 x 12 sheet of cardstock

Cut the corners and punch a hole for ribbon.

Then I took Tea Dye Distress ink and my foam blending tool and slowly started adding the ink to the edges and then spreading over the tag. You can also use foam makeup sponges for blending ink.

Now I want to start adding layers to my tag. I am starting by adding a few brown snowflakes.

I want to really age my tag by roughing up the edges which can be done by running your scissors over the edges of your tag or using a distressing tool such as this one by Tim Holtz.

Now I will start adding darker Vintage Photo Distress Ink to the edges of my tag which will give it a really dark almost burned look.

Now I added another layer by taking a sheet music stamp by Prima and stamping down one side of the tag.

I am also adding flourishes with the Weathered Wood Distress Ink.

Now it's time to glue my window on.


I am using my favorite glue stick for this.


See how it sparkles?

I found a glittered chipboard flourish which can be found at Michaels and used my favorite tacky glue to add to my tag.


I then added a stamp of the number 25. I also took a small red brad and metal photo corner to add deminsion to my holly stamp.

And here it is finished!

Now I want the snow to stand out on the tree branches so I took Picket Fence Distress Stickles and just lightly covered my branches.

See how it sparkles?

I found a glittered chipboard flourish which can be found at Michaels and used my favorite tacky glue to add to my tag.

Michaels carries these lovely glittered chipboard by Making Memories in brown, blue and silver.

I then added a stamp of the number 25. I also took a small red brad and metal photo corner to add deminsion to my holly stamp.

And here it is finished!

I hope you enjoyed seeing how I made this tag!
Be sure and come back tomorrow for another crafty idea from Twyla.
Have a great Thursday, Lindsey


xxx.jpg)


.jpg)


.jpg)


21 comments:
Thank you for all the beauty creations.
Irma Greetings from Holland xxx
Lindsey, I have been learning so very much from your last few posts! Thank you so much for sharing your knowledge with us. I had no idea how to create so many layers. The results are stunningly beautiful! Have a lovely weekend! Elizabeth
Yes, I'm with E! So many tips and ideas- thanks, Lindsey! I think I must get some of that stickles stuff! ♥
Hi Lindsey:
That's a fabulously beautiful tag! Thanks for the tutorial, too. I think I might even be able to do one, following your great instructions.
Hugs to you and T.
xoxo
Donna
Oh Lindsey ~ thank you so much for sharing how to do this! I've often wondered how the girls in blogland got their tags looking so beautiful!
Hugz,
michele
I'M WITH EVERYONE ELSE, THANKS FOR SHARING, I ALSO HAVE LEARNED A GREAT DEAL. MY FAMILY WILL THINK I'M SO TALENTED BECAUSE OF YOU. AGAIN THANKS.
I love your tutorials! (Been a smitch out of touch -- just now finding the time to blog-backtrack a bit.) Can't wait to make your delightful pin cushion! <-- Grea t stocking stuffer, indeedy!
Great blog! Thank you for sharing your techniques!! Diane
Oh, it turned out wonderful, so that is how you get the ink to be smudgy!
I love the little birdy welcome picture on your side bar. Is there any way you could email me that image so I may use it on a tag? It is SOOOOO cute!! Thanks Jenny
This post was just so...interesting! Lovely to see each stage.
May I wish you both a very Happy Christmas and New Year while I'm visiting you. Also may I thank you for support on my blog.
Hugs and Love Sue (UK)
suesfavouritethings.blogspot.com
Lindsey! Thanks so much for sharing your beautiful stained glass window and tutorial for making these beautiful tags! Your instructions are wonderful! Many thanks! Coralie
Just like everybody else I enjoy each of your tutorials! When you use Tim Holtz products we can buy it over here too. I think this tag can easily compete with Tim's! Have a great day! Thanks!
Thank you ever so much for sharing this lovely tutorial. I need to get myself more of those distressed inkpads. They are the best!
Maureen
Hi Girls! Another great idea and tutorial! Your things are always so sweet, like the two of you! Hugs, ;)
Distress ink, you are kidding me..I thought people were soaking them in tea...lol...great idea you two...now where do I find distressing ink>?
if you are not stresed is it possible to do this? Ü
madame samm
http://sewdollswhosnext.blogspot.com
You guys are killing me! You have so many ideas. Wow, great job.
LOVE the tag! I have been wanting to try that distress ink...I am now ready to go out and buy it! Did you know that I don't own a stamp...isn't that pathetic? Ok...I am making myself look bad - I am going shopping right now....lol...see what you did? LOL - thank you so much for sharing your FAB tutorials - you are awesome! Oh...love the garland too - now that I can do!
xoxo Jess
Hey Lindsey...
That is such a beautiful tag and a wonderful demonstration too, thanks so much for sharing! I love the distressing and the tea staining that you did to the background of the tag...I definately think it would pass for vintage...there are so many neat products out there to work with, isn't there?! Thanks for sharing all of your wonderful tips...
Big Hugs,
Queenie
I love to make tags. This tutorial is really good, and some really wonderful idea's. Thank you for sharing. This tag is really pretty.
Hugs, Mary
This is just beautiful! Thank you so much for the tutorial - I've often wondered about the steps involved in the beautiful tags I have seen - now the design process is more clear to me!
Post a Comment