Wednesday, March 31, 2010

Barbie Wednesday

Hello friends!
Today I wanted to share a few photos from older Barbie Wedneday posts


I was looking back through my posts and thought that you might enjoy seeing photos that I shared back in 2008!


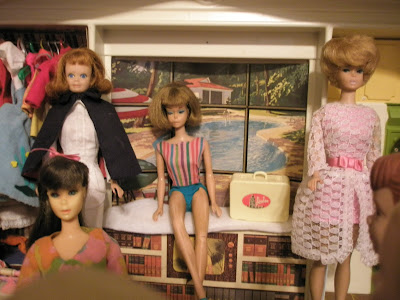
These are random photos of some of my favorite pieces such as this Twist N Turn Barbie and case.

My #4 Ponytail found at a Flea Market. Her ponytail was chopped off but I love her! As you can see in the photo her face is greasy. Greasy face is caused by plasticiser leaking out of the doll's face, and it can't be cured. It was commen is #4 and #5 ponytails.

This is a photo of my collection of Vintage Barbie Suzy Goose furniture. I love collecting these pieces!


I now have the trio! I purchased the Jacob doll last week so that I would have the set as I am a very big Twilight fan! Mattel anounced recently that they will release an Alice doll this Fall.


Hope you are having a lovely Spring day, Lindsey


Tuesday, March 30, 2010

Twyla on Tuesday

Hello dear friends.
Easter is approaching quickly and we still have images we want to share with you! 
This is a postcard that I got this year from 1911.
I have a weakness for little girls in pink dresses.


                                   I have been wanting to show you my collection of vintage crochet
                                                             potholders for some time now.


I can hardly resist them when I see one at a flea market.

Most of them are very inexpensive and I so admire the workmanship
of the ladies who created them.


Some of my favorites are the ones that look like children's clothing.


I don't think they were used as much as they were made for decoration.


Isn't this watermelon cute? 


 I have finished another afghan.  My son, Jordan, chose the colors and the pattern and it took me about two weeks to whip this one up.

Here is a close look at the stitch.  This is a new-to-me stitch that I am really enjoying. 
If any of you are interested, I'd be happy to share the pattern here.  It's super simple and can be applied
to many projects.

It's been a pleasure to visit with you all today.  Thank you for dropping in to see what we are
sharing today.
You all are so sweet to us and we appreciate each and every one of you!
Have a happy day!
Twyla

Monday, March 29, 2010

Joyous Easter Card Tutorial

Hello friends, today I am sharing a quick and easy card tutorial.

Start by folding a sheet of cardstock in half and cutting it to measure 5 x 7. I then took Vintage Photo Distress Ink and my favorite blending tool, and in circular motions I created a soft vintage look to the card. 

I then cut a 4 1/2 x 6 1/2 piece of patterned paper and inked the edges with Vintage Photo Distress Ink. Glue the patterned paper to the center of the card.
The paper used for this card is by Basic Grey from the new Kioshi collection.

I cut a 1 1/2 inch strip of patterned paper and punched a decorative edge along one side. If you don't have any edge punches, you could use pinking shears or tear the edge.
 I used a new punch by Martha Stewart. It is called Iron Gate punch.

I cut the strip to be 4 1/2 inches long and added 2 strips of baby ric rac to the edge and glued to the left side of the card.

Print and cut the vintage card at the top of the post.
I inked the edges of the card with Vintage Photo Distress Ink and glued to the card. I also added a pink button and 3 small cream colored adhesive pearls to the card in the lower righthand corner.


One of my favorite new techniques is to add faux stitching to my work. I use Signo White Gel Pen to add my stitching

It looks time consuming but goes pretty quickly and I love the look it gives to everything!

I hope you enjoyed this tutorial!
Have a lovely day, Lindsey

Sunday, March 28, 2010

Antique Images

Hello Friends!
Today we wanted to share with you some of the darling images that we found at our new antique mall.
We couldn't resist this postcard from 1912 that had a puppy on it!


The next was a page from an old children's book.


This next one is particularly cute.  It is a rather large advertising card from the Plano Manufacturing Co.

May you all have a most blessed Sunday!
Enjoy your day!
Twyla and Lindsey

Friday, March 26, 2010

Let's Go Antiquing!

Hello lovely ladies!
Most of you know that the most fun we have is going to flea markets and antique malls.


There is nothing more exciting to us than a day of treasure hunting in some of our favorite stores.
Unless!  It's finding a brand new store that we've never been to before!


This happened to us this week when we discovered a new antique store in our area. 
It was a lovely sight to behold with lots of things to drool over.

You can be sure we will return again and again.
You know us, what we ended up buying was some adorable vintage images and postcards that we will be sharing with all of you!
I hope you had fun antiquing with us!
Have a lovely day!
Twyla and Lindsey

Wednesday, March 24, 2010

Barbie Wednesday


Hello Friends!  Today I wanted to share a few interesting Barbie facts!


More than 105 million yards of fabric have gone into making Barbie and her friends' fashions, making Mattel one the largest apparel manufacturers in the world.

The Midge and Allen doll was retired in 1966 and were not reintroduced until 1988!


Barbie has had 126 careers. The newest being a comuter engineer.

Mattel has officially anounced that Barbie and Ken have officially broken up again.


I hope you found these facts as interesting as I did!

Have a wonderful day, Lindsey

Tuesday, March 23, 2010

Easter Greetings Egg Tutorial

Hello Friends, today I am sharing another vintage inspired Easter tutorial.


Here is the sweet little egg shaped wall hanging.

Start by cutting an egg shape out of cardstock and out of vintage sheet music. If you don't want to free hand your egg, you can find printable templates on google. My egg measures 5 1/2 x 7.


Glue together to make your egg more sturdy. I then inked the edges using Vintage Photo Distress ink.

Cut out the Vintage Greeting card pictured at the top of the post. Cut the edges with pinking shears and ink the edges. I used a Shabby Pink Cat's Eye ink pad.

I then cut a 1" circle and distressed the edges using the edge of a pair of scissors. I then inked the edges with Shabby Pink Cat's Eye ink. The paper is by October Afternoon's Ducks In A Row collection.

I then glued a pink and yellow button to the center.

I glued the circle to the card to cover up the "For Daddy".

Glue the card to the center of the egg.

I then added a strip of blue ric rac along the bottom of the card.

Next, I added a flower shaped yellow button.

I then cut a strip of paper 2 x 8. I trimmed the edges to create a banner. This paper is from October Afternoon's Ducks In A Row collection. I inked the edges with Vintage Photo Distress Ink.

I glued the banner strip to the middle of the tag.

Lastly, I punched a hole at the top of the egg and added ribbon and a matching bow.
 
Enjoy creating for Spring!
Wishing you a wonderful day, Lindsey