Hello friends, I am sharing an Easter Bunny tag tutorial today.
I started by cutting a piece of carstock 3 x 6. I then cut off the corners and punched a hole at the top to create my tag. Now I am going to start coloring my tag using Shabby Shutters Distress Ink . To get a nice even coverage of ink on your tag, use a blending tool
 that has a foam base. This one is by Tim Holtz and it's my favorite tool! I reach for this to color and distress all my projects.
Next, I add Broken China Distress Ink to color the top half of the tag.
You want to cover your tag by rubbing the tool in a slow circular motion to get a nice soft look.
Now I am adding a little bit of Dusty Concord Distress ink along the bottom of the tag. The more colors and layers you add the better! I love how the colors change as you add the different colors.
I decided that I wanted ny tag to look more green so I grabbed my Shabby Shutter Distress Ink and add more along the bottom, making it look like grass.
Now I am going to add Vintage Photo Distress Ink around the edges of the tag.
Now I am going to add Vintage Photo Distress Ink
I then cut out all the pieces of the vintage card pictured at the top of the post.
I cut out the "Happy Easter" title to be 3/4 x 4 and cut both ends. I inked the edges with Vintage Photo Distress ink.
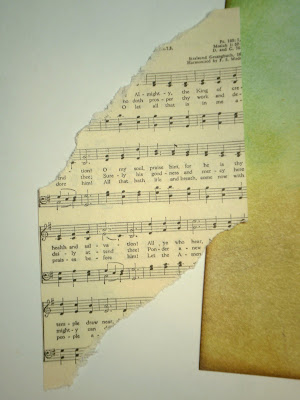
Next I cut a piece of vintage sheet music 3 inches wide and ripped diagonally along the top and bottom.
I then added Vintage Photo Distress Ink to the edges and glued to my tag.
Next, I glued my vintage images to my tag. I used foam adhesive to adhere the title to make it stand out.
I then took Rock Candy Stickles which is a clear glitter glue and lightly covered the bunny.
When dry, the clear glitter has the perfect Vintage glitter look!
Add twine and a bow to the top of the tag and it's done!
I hope you enjoyed this tutorial and have a lovely Spring day!
Lindsey








.jpg)


.jpg)
















25 comments:
i truly love your own posting taste, very unique,
don't give up and keep posting for the simple reason that it simply truly worth to read it,
impatient to see much of your own content articles, have a great day!
Thanks for stopping by and becoming a follower. When I started blogging, I intended to post about my crochet projects also, but the yard sales and vintage stuff is more fun. And I've 'met' some many wonderful people.
Cute, Lindsey! I love the tag and thank you for showing me how to make it. I know mine won't look as cute as yours:) Have a blessed day!
Thanks, Lindsey! It's so cute the way it looks like he's running uphill!
All my creating has come to a halt! Guess it's time to clean up the craft room! ♥
How sweet Lindsey! Thanks for sharing! :) xx
It's amazing how you can have an "inner eye" for something like that. Just looking at the original card I wouldn't think twice about it, but cut it up and add some color, and you have a masterpiece!
I love it, and that distress ink is what really makes it special! Thanks for the tutorial!
Happy Monday!
Carol
This is so cute!
Hope you girls have a great week!
Big Hugs,
Queenie
You make it all look so easy! That's an adorable tag. :)
Hi Lindsey,
What a lovely tag! Thanks for sharing your creativity with us.
Hugs,
Meri
Cute! I'm going to have to get me some distress ink I really like the way it looks.
You are so talented and I really admire anyone who can do this! You have a great "eye" and are very artistic!
Way to cute! I love seeing all your creative gift tags. I really have to try this time, it looks like a lot of fun!.
I really enjoyed your post.
Take care and hugs, Elizabeth
Sweet tag! Thanks for the distress ink demo! I have seen it, and saw a video of Tim Holz, but your pictures gave me a true pic of what the inks actually do! Thanks,
Kate
Very nice, Lindsey. You are so creative.
What an adorable Easter tag, Lindsey! You're so good at these--thanks for sharing your wonderful talents with us!
Oh Lindsey that is toooo cute! Seeing your ideas...makes me want to try my hand at paper craft. You make it look so easy.
Have a crafty day!
Super Cute! You guys are the best!!
Hugs, Lisa
It is so cute. I love reading your blog because of the detailed instructions step by step. I just love the images that you share. Take care.
Thank you for coming by my blog. your vintage collections and projects are awesome.tfs ;)luv,jaz
Very cute, Lindsey!
I am having a "Blue Monday" giveaway~stop by to see~
Thanks...Have a terrific week!
Carrie
I love anything you make with music in the background! Just lovely! Makes me want to play my piano! ♥
Very sweet, Lindsey! I could see the glitter on the bunny too.
Spencer looks daper with his new haircut!
Take care.
Warmly,
Deb :)
Hi to both of you. I can hardly peek at any vintage card without thinking of both of you...or a Barbie Doll...You'll like this weekends game show...It's called Dollyopoly...were going to have a blast. Join the fun if you have a minute. Many dolls will be featured!
So sweet Lindsey - thanks for showing us the how-to. Loved your doggie's new do and Twyla's pictures. My girls got me two old baby photos for my BD at an estate sale the other day.I also collect vintage twins photos. They are hard to find, and if I find one on ebay, there is usually a lot of bidders for it.Have a good Spring day - is the snow melted?
Blessings, Sarita
Post a Comment