Hello Friends, Today I am sharing a tutorial for 2 more pages in a Vintage Valentine themed paper bag album.
To start page 3 in the book, cut a piece of paper 5 1/2 x 6.
Cut a piece of cardstock 5 x 5 1/2 and sheet of patterned paper 4 1/2 x 5. Glue together to create a photo mat.
I then made this bow by taking an 8 inch strip of pink ribbon and cutting off 2 inches. Cut another 2 inches piece from another strip of ribbon. I used red. Tie a knot in the center of your 6 inch strip ribbon but before you pull it tight, slip both pieces of ribbon through the loop and then pull tight. Cut the ends at an angle. This will create a nice small bow.
Print and cut the Valentine.
Take one end of your ribbon and glue to the back of your mat and wrap around the front and glue the other end on the back. Make sure you have it glued down tightly. Tuck the Valentine to the edge of the mat and glue the photo mat to the center of your page. Add blue ink along the edge of your page. I have been using a Cat's Eye Ink Pad in Aqua for this book. These can be found at your local Scrapbook store or at Jo Anns.
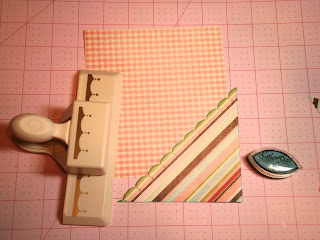
For the 4th page in this book start by cutting a sheet of paper to 5 1/2 x 6. Next cut a 5 x 5 sheet of paper and then cut it again from corner to corner. I then took a Martha Stewart Scallop punch and punched across longest side. You can find the punch at Michaels or here at Amazon . I then added blue ink across the scalloped edge to make it stand out.
Turn your triangle paper piece over to the back and just add adhesive to the straight edges. Not in the middle. This will be a pocket.
Glue to the bottom right corner of your page. Then add a decorative piece to the front of your pocket that can either be journaling, a date, a photo or another vintage Valentine. I added this little die cut piece from the Cupid Collection by Pink Paislee. I used adhesive foam dots to make this piece pop out from the page.
Cut and print Valentine postcard.
Add your postcard to the pocket.
I then cut a piece of cardstock to be 4 x 5 1/2. Next I cut a sheet of patterned paper to be 3 1/2 x 4 1/2. I cut it half an inch shorter than I needed and cut another piece of patterned paper half an inch and punched one side. This is optional but adds a cute touch to the mat. Glue both pieces to the cardstock to create a photo mat.
Add the mat to your pocket. Add blue ink around the edges of your page. Then I added a little bit of bling to my page by taking this red pearl adhesive accent by Prima which can be purchased at your local Scrapbook store or Michaels.
I hope you have enjoyed following along with 2 more pages in my book! Stay tuned for more pages and a look at the book when it's finnished!
I am using the Cupid Collection by Pink Paislee. If you would like this paper too you can find it here on ebay.
Have a great Monday, Lindsey









.jpeg)


.jpg)


.jpg)

















12 comments:
This gets better and better! I'm making a journal for One World One Heart and I think I am going to use a few of your images. Thanks girls, you are always so helpful! Have a lovely day filled with inspiration!
Cute! Thanks Lindsey! I've never made a pocket before! I'll have to try it!
I have a hard time with matting... I cut and cut and never get the right sizes going and it makes me feel so inferior so I quit trying! My crafts must lift me up-not bring me down!
I'm still making cards up here. It's so fun! I've run out of card stock though and must go buy some today. You should see me scrounging around for more to print with! Pitiful!
Have a great week, Lindsey! ♥
absolutely spendiferous! And congratulations on being published in Artful Blogging!! I have missed you!!
You amaze me with your ideas and how you make everthing look so effortless. This is a really lovely idea.
Susie
Another fabulous tutorial and I love what you've done with your crafty papers and punch! Thanks so much!
Your pages are wonderful...thanks for sharing with us...Have a great day...
looking forward to the rest..
Sweet Blessings...
Tonja
Hola Twyla and Lindsey, so beautiful, so pretty, wonderful valentine paper bags!!!! You both do awsome crafts, really love them!!!!!
How nice you work together, mother and daughter, lovely!!!!!!!!!!!
Muchos cariños,
Maria Cecilia
Lindsey, thanks for breaking down the process into baby steps and showing us that we too can make beautiful things!
You create the most beautiful things! And I LOVE seeing them all. Thank you.
Oh no I have gotten so far behind on my blogging! I had to look back at all the wonderful things you have made! I just love all the paper, such nice colors!
Absolutely my next project! Thank you so much for the how to! It is just so beautiful! E
Thanks for the fun images. I've been wanting to try one of these paper bag books. I have my weekend project!
Post a Comment