Thursday, December 10, 2009

Christmas Tag Tutorial

Hello friends, I want to share with you a tag that was inspired by Tim Holtz, my favorite crafter and creator of some of my most favorite products!!!

On Tim's blog he is featuring his annual 12 days of Christmas tags! Every day for 12 days he has been sharing tutorials on how to make gorgeous tags and great tips on using his products! I hope you visit his blog and take a look at his beautiful and inspiring tags!


Now this is the tag I will be sharing with you today!


Start by printing this vintage card and cutting out the window.


Cut a sheet of white cardstock 3 x 6 inches. You can get 8 tags out of a 12 x 12 sheet of cardstock


Cut the corners and punch a hole for ribbon.


Then I took Tea Dye Distress ink and my foam blending tool and slowly started adding the ink to the edges and then spreading over the tag. You can also use foam makeup sponges for blending ink.


Now I want to start adding layers to my tag. I am starting by adding a few brown snowflakes.


I want to really age my tag by roughing up the edges which can be done by running your scissors over the edges of your tag or using a distressing tool such as this one by Tim Holtz.


Now I will start adding darker Vintage Photo Distress Ink to the edges of my tag which will give it a really dark almost burned look.


Now I added another layer by taking a sheet music stamp by Prima and stamping down one side of the tag.


I am also adding flourishes with the Weathered Wood Distress Ink.


Now it's time to glue my window on.


I am using my favorite glue stick for this.


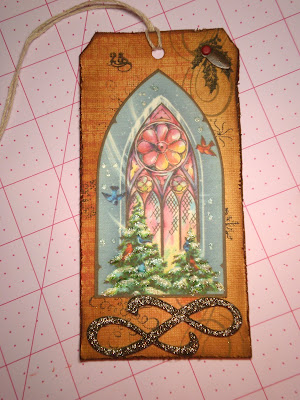
Now I want the snow to stand out on the tree branches so I took Picket Fence Distress Stickles and just lightly covered my branches.


See how it sparkles?


I found a glittered chipboard flourish which can be found at Michaels and used my favorite tacky glue to add to my tag.


Michaels carries these lovely glittered chipboard by Making Memories in brown, blue and silver.


I then added a stamp of the number 25. I also took a small red brad and metal photo corner to add deminsion to my holly stamp.


And here it is finished!


I hope you enjoyed seeing how I made this tag!
Be sure and come back tomorrow for another crafty idea from Twyla.
Have a great Thursday, Lindsey

Wednesday, December 9, 2009

Vintage Images and My Favorite Glue!

Hello Friends, I hope you are enjoying the vintage images! They are all so special to me and I am enjoying sharing them with you!


This is a page from a vintage Golden Book.


I love this sweet little red house!


I have had several questions as to what glue I use. So I want to show you my 3 top favorites!
My very favorite is this glue stick! It is my go to glue for everything. It is super sticky, dries quickly yet gives me a few seconds to reposition. It's great for crafters and scrappers!
The best part is that it's available at Wal Mart and Hobby Lobby for $ 1.99.


My favorite wet glue for glitter and ric rac is Aleene's Tacky glue.
It is available at Wal Mart and most craft stores.

I also love the ease of double sided tape. This is my favorite and can be found at Wal Mart. I could go through two a week if I let myself!
I hope this has been helpful!
Have a wonderful day, Lindsey

Tuesday, December 8, 2009

Mini Collage Tutorial

Hello friends,

Today I am sharing with you one of my favorite vintage images!


I absolutely love this vintage card with these sweet little angels.
I created a mini wall hanging and thought I would share with you how I made it.


Take a piece of cardboard and cut it 6 x 6.


Cover it in cardstock wrapping around the edges. I do this just so the exposed edges aren't rough. It doesn't matter what color cardstock you use as it will be covered.


I then cut out the image.


I inked around my image to make it stand out more.


Glue a decorative patterned paper on your cardboard. I am using Cosmo Cricket's "Jolly by Golly" paper line. I love this line and have been using it through out almost all tutorials so far!


Cut a decorative strip of paper and punch with an edge punch to go across the bottom. I then took brown ink and my favorite blending tool to add a vintage look to both the paper and the strip. Glue down. Add a strip of decorative ribbon such as this scalloped velvet ribbon.


Glue another strip of paper along the top.
I then took blue chenille ric rac and glued across the top of the velvet ribbon.


Cut a 5 inch circle out of patterned paper. I used a sheet from Basic Grey's "Eskimo Kisses" paper line.


Slipped down beneath the edge of your bottom strip and glue.


Glue your vintage image to the middle of the collage.


I added a cute blue flower that I found at Michaels in their Wedding section.


I used a product called "Rock Candy" crackle paint. It gives a really cool vintage look to anything and is completely clear!


The "Merry Christmas" title I used is from another vintage card image that I cut out.


I then used a bottle of glitter glue called Stickles. This particular color called "Rock Candy" is completely clear! I love this stuff! It really gives you that vintage glitter look!


I just lightly used it along the angels dresses at the bottom and on the star. I also added gems to the snowflakes across the top.


Now just glue ribbon to the back for your hanger and it's done!


I hope you enjoyed this tutorial and I hope you enjoy using these sweet little angels!


Thank you for stopping by, Lindsey

Monday, December 7, 2009

Sugar Kissed Pin Cushion


Hello! Some of you may remember the pincushion I made for Halloween. I had a request for a tutorial on how to make them so I thought I would make a Christmas version.
Again I'm using the tea dyed muslin that I purchased at JoAnn's. It is such a nice color.
I drew a circle using a saucer as my template. There will be two circles.


I then had Lindsey stamp a Christmas image on one side with pigment ink.


With right sides together, stitch around circle 1/4" from edge, leaving a space for turning.


Turn right sides out and fill with fiberfill as full as you can get it and sew closed.


Choose a button. Thread a long needle with doubled DMC, I used the color 321. Stick needle up through the center and through the button. Now go back down through the button and out the bottom. You'll now bring the thread around the sides and down underneath the button.


Do this in sections until you have it sectioned like the sample below.


One day at a flea market I discovered an old hanging basket for plants. I immediately had another idea for how to use it.


I switched the chains around and hung it upside down to hang vitage ornaments from.

I hope you like this idea, too!


Have a wonderful day! Twyla and Lindsey