Hello friends,
It's time for another tutorial! This one features a cute sewing pattern!
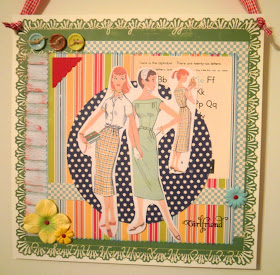
Here is a look at the finished collage.
This collage was created mostly using this beautiful 8 x 8 paper pad. It's called Report Card and it's by October Afternoon.
I started by taking the striped 8 x 8 sheet and cutting around the edges with my pinking shears. I then used an Aqua ink pad to go around the edges of the paper.
I then took a 12 x 12 sheet of patterned paper by Cosmo Cricket that looked good with this paper line. I cut it down to 10 1/2 inches and used a Martha Stewart edge punch to go around the edges of the paper.
I then cut a 12 x 12 sheet of white cardstock 10 1/2 inches and glued the patterned paper to the center.Print and cut out the pattern at the beginning of this post.
Here is a close up look at the punched edge on the green patterned paper.
Then I added a strip of crepe paper along one side of the striped patterned paper. I started by turning the paper over and placing a strip of double stick tape along one side.
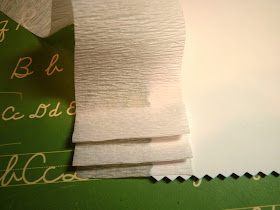
Next, I took the crepe paper and slowly pleated it up one side. I get a nice clean edge using the double sided tape because I can line the crepe paper along the edge of the tape.
Here is how it should look once you have finished pleating. I have NOT yet glued the striped paper to the collage yet.
I then added a touch of red ink along the white crepe paper to distress it.
I took an 8 x 8 sheet of blue checked paper and cut it to be 6 3/4 x 8. I then glued the paper along the upper right side of the collage. I then cut from an 8 x8 sheet of patterned paper a 4 x 5 rectangle that featured this cute aqua and black alphabet. Glue the striped paper to the center of the collage. From the blue check paper I cut a 3/4 x 8 inch strip and glued it across the striped paper.
I then added 3 buttons along the top and a scalloped photo corner to the collage.
Here is another look at the collage so far. I added the title of my collage "Girlfriend" which is from a crafty Secrets stamp set .
.
I then took an 8 x 8 sheet of blue star patterned paper and cut a 6 inch circle, then glued it to the center of the collage.
Add your pattern image to the center of the collage.
Next, I added yellow flowers to the bottom left corner.
And a blue flower to the right side.
Punch a hole at both top corners and thread ribbon through to finish the collage!
I hope you enjoyed this tutorial! I had fun creating it! The paper was so bright and cheery!
I hope you are having a wonderful weekend, Lindsey


super lovely!!!!
ReplyDeleteOh this looks just great and thanks for posting this idea.
ReplyDeleteGorgeous! A perfect gift for a girlfriend. Blessings, Tammy
ReplyDeleteThis is just neat! I have the darndest time "seeing" what can go together! I hope I learn this soon! I am getting a little miffed at myself! Miss Patient I'm not! I am going to take a few more looks at this for sure! Thanks you two!
ReplyDeleteWonderful Lindsey! I love that October Afternoon style--perfect for this type of thing! You always share such lovely things--and you're so good with the tutorials!
ReplyDeleteHope you and your Mom are having a lovely weekend!
Super cute! Love the dress pattern. And the edge you made on the chalk board paper is really pretty!
ReplyDeleteHeej Lindsey,
ReplyDeleteI LOVE IT, I LOVE IT, I LOVE IT
So cute those lovely pattern, a great creation.
Greetings from Irma xxx
Oh yes! Such fun and happy girlfriend colors and patterns!
ReplyDeleteAh -ha! I see you managed to punch your corners! The corner looks a bit bigger so did you use 2 seperate punches? Do tell! ♥
Love it Lindsey! I will be trying this soon:) Have a blessed day dear friend!
ReplyDeleteThis is a great collage Lindsey! All of the papers work great together (gotta love OA) and the punched and cut edges make all of the layers stand out. I love vintage pattern envelope graphics-this was the perfect choice for a giflfriend piece. You just keep getting better all the time!
ReplyDeleteThank you so much, Lindsey. I love these old sewing patterns--and what you did with it--great tutorial!
ReplyDeleteHi Lindsey...love the sewing pattern and as always such a great tut...thank you for sharing your talent with us...love the sweet tally cards in the older post...
ReplyDeleteHave a Blessed day....
Sweet Blessings...
Tonja
I love that you used the front of a pattern for your design. I have sooooo many that it would be great to have a multiple use for the covers! (scan and print, scan and print!)
ReplyDeleteThanks, Lindsey!
xoxo
Donna
Hi Lindsey,
ReplyDeleteWow, what a cute collage, and so easy! Great use of color and coordination. I currently have a tag book at Stampington's being considered for publishing that looks like this......too cute.
Hugs,
Meri
I'm facinated by old patterns too. When I had my store I used to wrap peoples items in old patterns. This is a creative avenue you traveled down...love to see even more ideas.
ReplyDeleteThat is fabulous, Lindsey!
ReplyDeleteLove your vintage pattern and how you incorporated it into a lovely piece to hang. I just posted four of my grandmother's apron patterns yesterday on my blog! I see yours cost 35 cents mine were only 25 cents! Oh, the good old days.
ReplyDeleteTeacup Lane (Sandy)
WOW...thanks for this tutorial, I am just getting into papercrafting and I learned so many techniques from this!! You are awesome and this little collage is fabulous for Spring!
ReplyDeleteHappy Sunday, xOxO Nerina
Nice post and this enter helped me alot in my college assignement. Gratefulness you for your information.
ReplyDeleteGreat tutorial once again, I'm always picking up sewing patterns and it's great to have an idea what to do with them
ReplyDeleteVictoria xx
What a great tutorial! You have such good ideas on how to use everyday items! Love it!
ReplyDeleteHow cute and pretty! I would love that for my sewing room...I'll have to give it a whirl!
ReplyDeleteI've had this Martha punch on my list for awhile and your project is pushing me over the edge to buy it!
ReplyDeleteLovely project!
Lindsey, I love this! Your vintage art is very inspiring. I LOVE your guys' blog here! :)
ReplyDeleteI love it--great colors, fun papers!
ReplyDeleteMy daughter would just love this! I love to send her little things now and then and I think this one would be great!
ReplyDeleteThanks!
I am catching up on my reading since I am home today because of all the snow that we have had. It has been really something else here lately. I love what you show us how to do. I just wish I had the time to do it. Take care.
ReplyDeleteI love this, it looks wonderful! Thanks so much for the great ideas!
ReplyDeleteSo beautiful. Great tutorial, thanks ever so much for sharing it.
ReplyDeleteMaureen
Thank you for sharing that with us Lindsey, so charming! I love vintage sewing patterns and recently I was inspired by a blogger who used an image from one - wish I could remember whose?!! I ended up scanning an old pattern envelope of my mother's and using it on the front of a card for a friend - I'll post it for you to see. :)
ReplyDeleteHappy week to you both!
Hi again! I posted my card for you to see and I also found my original inspiration and included the link. (it's on my Monday blog love post today)
ReplyDeleteHappy Monday!
very sweet love the colors.Thanks so much for the visit too!~~Becky
ReplyDeleteI LOVE it! I'm going to be doing some collages for the fair and stuff and my mom has been doing some vintage ones! Did you guys know my mom had a blog? It's holidayinthesun-becky.blogspot.com! It's great!
ReplyDeleteUnbelievable~you are so good at that!
ReplyDeleteSo cute and fun!! :)
ReplyDeleteYou make the cutest things! I love that!
ReplyDeleteBlessings
Linda
You are 'two crazy crafters'! I love your work Lindsey. Your instructions are so clear!!
ReplyDeleteYour moms crocheting is gorgeous too!
Hugs and Love Suex
Lindsey, I had so much fun learning so many new techniques with this block. I just love it! I will be on the lookout for cute patterns! Thanks for all that you share! E
ReplyDeleteLindsey, I wanted to ask you if I may add your name to my Block of the Month Club as someone people can go to learn techniques and be inspired to create their own blocks. Might you create a little button that could link people to you? It would be so fun to be able to visit different blogs and learn different techniques and styles. I am so inspired by your work and learn so much, I would love to advertise about it each month! Let me know. I am also hoping we can get Julie to participate. E
ReplyDeleteWhat a cute idea. Love that crepe paper edge. I bought some at the dollar store the other day to try some flowers but will try this idea for sure.
ReplyDeleteThis is just darling...your choice of colors, patterns, the composition...well done! Thank you for the lesson. :)
ReplyDeleteAbsolutely love this and the images you have used! What a great idea to make a little hanger!
ReplyDeleteLou xx
I love this one!!! Saved the picture of the pattern..Thanx for sharing
ReplyDelete